Sunday, March 10, 2013

Diamonds Are a Girl's Best Friend

This week's cake was for a friend's mom who was celebrating a milestone birthday. My idea was a cake that was classy, feminine, and had a little bling. After all, how else should a girl celebrate a milestone birthday but with diamonds and chocolate.

The cake was chocolate with a whipped vanilla frosting and covered in Satin Ice buttercream fondant. The diamonds are isomalt which is a sugar substitute used to make hard candy, and I used a candy mold to get the shape.


Happy Birthday Marion!


Tuesday, March 5, 2013

Pretty In Pink Baby Shower Cake

This weekend was another fun and fabulous baby shower. I, fortunately, got to make the cake. I made grandma Ruthie's italian cream cake which I make with a cream cheese frosting. Yes the piping took forever, and yes I colored each gradient.


Yummy!

Thursday, February 28, 2013

Parisian Inspired Cake Pops

I'm not usually a step-by-step blogger but I recently tried out a new baking contraption and thought I'd blog a little more in-depth about it. I picked up this sweet new toy from Target:


It cost me $20 and it was seriously one of the best gadgets I've bought for this cake making buis-nus. I say that, mostly because I think cake pops are a pain to make. Anyway, this machine cuts production time a lot. It takes 3 1/2 minutes to cook 12 pops and this is what you get:


I think I appreciated the very small learning curve the most. I only burnt half a dozen and I still ate that half dozen. 

The shower was a Parisian themed baby girl shower and I made a red velvet cake with a white chocolate coating. I lessened the food coloring in the red velvet recipe to make it more of a pink rouge. I liked the vintage tone of the cake.

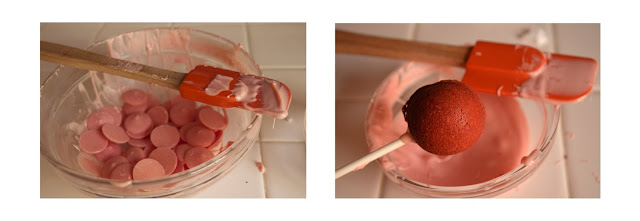
After the baking I let it sit for 10 minutes before inserting the lolli sticks with chocolate on the end and stuck them in the fridge for at least 15 minutes. I used Wilton candy melts because they come in a variety of colors and taste pretty good. I have read and experimented with adding gel coloring to chocolate but I would advise against it. If the temp is not right or you add too many drops, the chocolate will harden and and you'll have to start over. Also if you buy cheap chocolate I noticed it won't work as well either. 

After inserting the stick, I poked each pop into a styrofoam cube and set it in the fridge for 15 minutes. I then dunked each pop in two coats of the chocolate melts. If you don't do a second coat you'll see the cake coming through; especially with a darker cake.

I finished the pops off with a royal icing-piped Eiffel tower in black. I would have chosen gray for a more vintage look but the color scheme of the shower was pink and black. 

Yum!


Friday, February 15, 2013

Dr. Seuss First Birthday

I just love first birthdays. For most kids, its the first time they get to taste sweet like they've never tasted before. And the look on their little tiny faces when they see this bright cake with a flaming stick all for themselves is priceless.

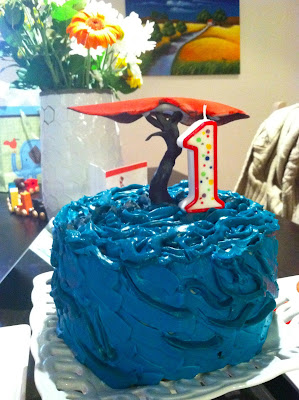
A couple weeks ago I got to make a smash cake and cupcakes for a cousin's second son. Both parents thought it a neat investment to present their children with a large lithograph of Dr. Seuss's work on their first birthday. I thought it a splendid idea to theme the cake and cupcakes after the print. The print they chose is called "Lion Stroll."

"Lion Stroll" By. Dr. Seuss

I usually bake a 6-incher for the smash cake which is usually just enough to smash into and a little bit leftover for the parents to help themselves to. I went with Grandma Ruthie's italian cream cake recipe since she is little Lukie's great grandmother. 

The book was included to reference the print.


I made a tree out of gumpaste which had to be made two days before to ensure it was fully hardened. The frosting on the cake was piped with a couple different tips (the flat tip used for basket weaves and a leaf tip). The cake and cupcakes were tinted orange and the frosting on the cupcakes were tinted vermilion. 

And a couple pics of the birthday boy and his family. He loved it, then didn't know what to do with it, so started throwing the cake on the ground...boys.....


Monday, February 4, 2013

Welcome to the Gun Show

I'm not usually into guns, and with the recent battle between the government and the NRA on gun control, I've taken a no-comment approach to any such conversation. But when someone sends me a message the night before a birthday asking for a gun cake, I couldn't resist such an opportunity.


I got to choose any gun I wanted so I went with a pistol because it seemed to be the easiest to build.  I built the cake using an 8" cake pan and a bread pan which I cut in half and stacked. The gun measured 11" long and 8" high. I painted the surface with black Americolor gel coloring mixed with vodka. When painting on fondant, I recommend using something with alcohol such as vodka or lemon extract because the gel will dry quicker. Water mixed with gel never fully dries. I would also recommend using vodka over any other kind of spirit because its scentless.

The cake is double chocolate with whipped dark chocolate frosting and chocolate fondant.